DALGLEISH, John Alexander
(Service number 8/31)
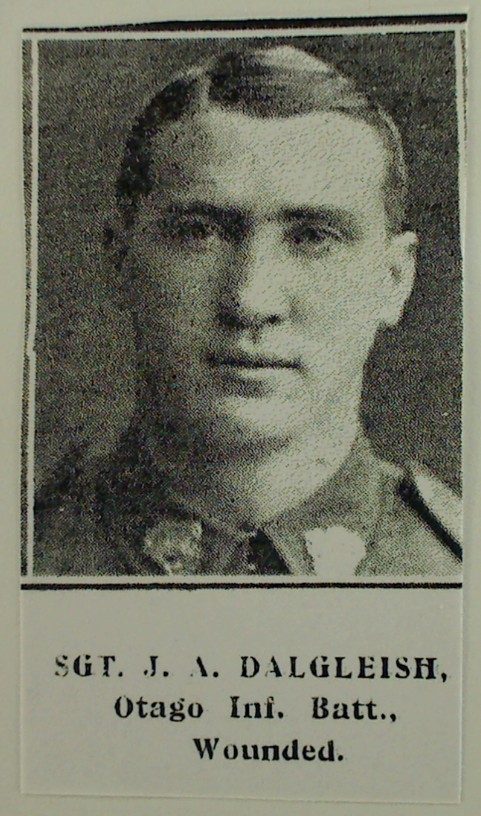
| First Rank | Corporal | Last Rank | Sergeant |
|---|
Birth
| Date | 15 April 1892 | Place of Birth | Walkerburn, Scotland |
|---|
Enlistment Information
| Date | 15 August 1914 | Age | 22 |
|---|---|---|---|
| Address at Enlistment | Wharfe Street, Oamaru | ||
| Occupation | Shipping Clerk | ||
| Previous Military Experience | |||
| Marital Status | Single | ||
| Next of Kin | Mrs Margaret Dalgleish (mother), 49 Elizabeth St, Timaru | ||
Military Service
| Served with | NZ Armed Forces | Served in | Army |
|---|
Embarkation Information
| Body on Embarkation | Main Body | ||
|---|---|---|---|
| Unit, Squadron, or Ship | Otago Infantry Battalion | ||
| Date | 16 October 1914 | ||
| Transport | Ruapehu or Hawkes Bay | ||
| Embarked From | Port Chalmers | Destination | Suez, Egypt |
| Other Units Served With | |||
|---|---|---|---|
| Last Unit Served With | Otago Infantry Battalion | ||
Military Awards
| Campaigns | Gallipoli Campaign | ||
|---|---|---|---|
| Service Medals | 1914-15 Star, the British War Medal (07/10/1921), Victory Medal (18/08/1922) | ||
Award Circumstances and Date
No information
Prisoner of War Information
| Date of Capture | |
|---|---|
| Where Captured and by Whom | |
| Actions Prior to Capture | |
| PoW Serial Number | |
| PoW Camps | |
| Days Interned | |
| Liberation Date |
Death
| Date | 9 August 1915 | Age | 23 |
|---|---|---|---|
| Place of Death | Gallipoli, Turkey | ||
| Cause | Killed in action | ||
| Memorial or Cemetery | Chunuk Bair (NZ) Memorial, Chunuk Bair Cemetery, Gallipoli, Turkey | ||
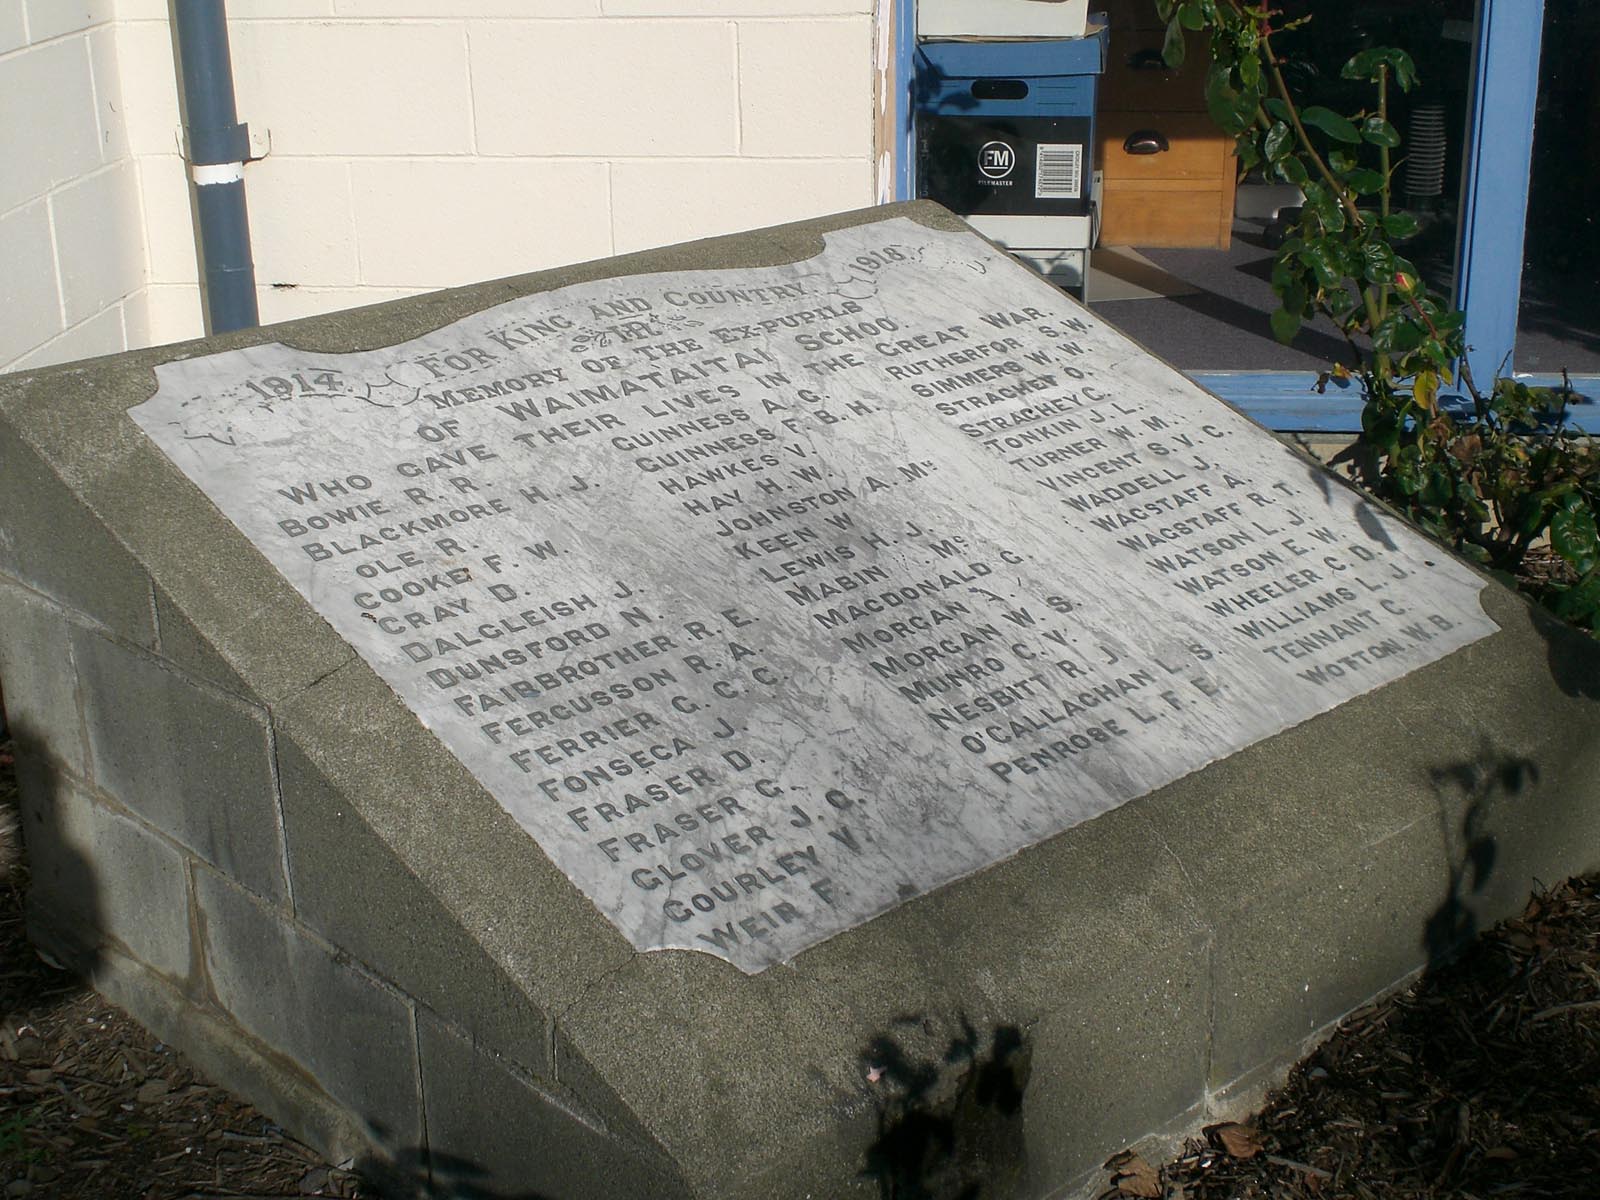
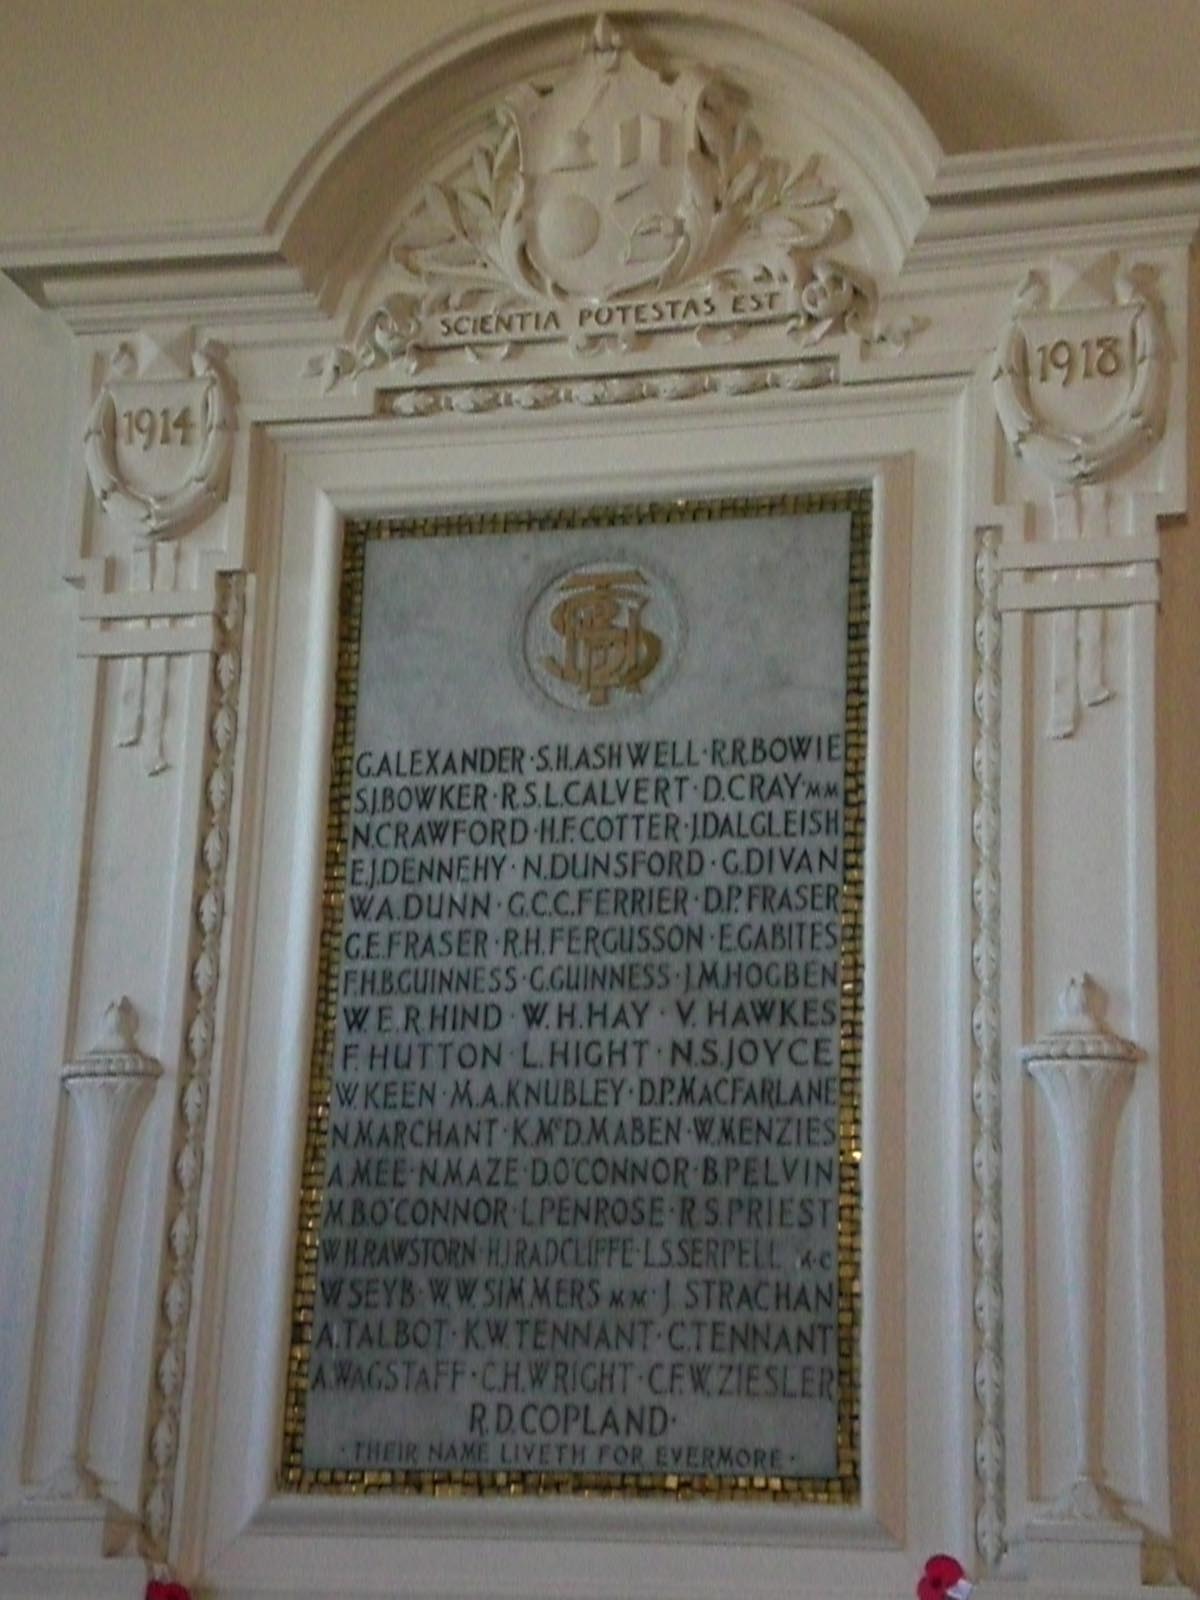
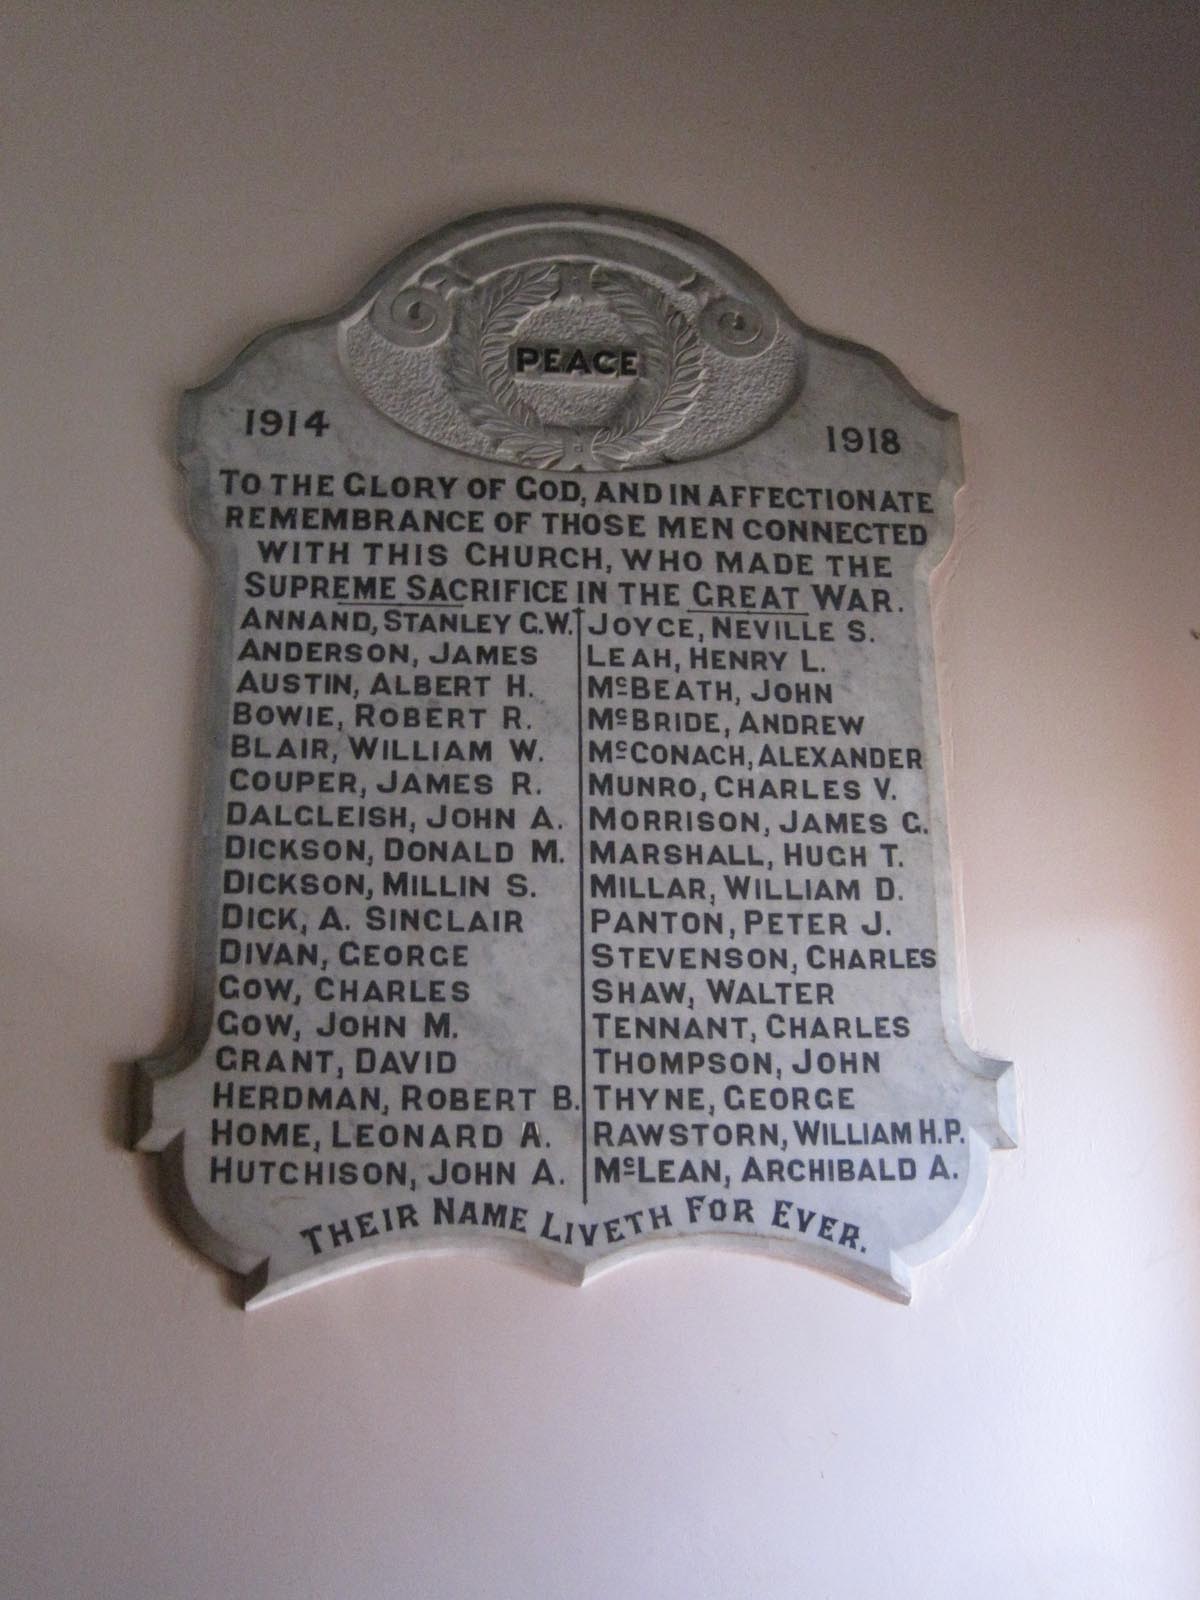
| New Zealand Memorials | On Memorial wall, Timaru; Timaru Boys High School War Memorial (Library); Waimataitai School War Memorial; Chalmers Church Memorial Plaque | ||
Biographical Notes
John Alexander Dalgleish, also known as Jack, was born in Walkerburn, Scotland on 15 April 1892. His parents were Thomas Virtue and Margaret Jamieson Dalgleish. When John was 8 months old, his family emigrated to New Zealand, leaving England on the Aorangi in early December 1892, destined for Port Chalmers. Traveling with them were John’s four older brothers, Richard William, Virtue, James Jamieson, and William. Virtue, James, and William also all served in World War One. Thomas and Margaret would go on to have two more children, but sadly, they died as infants. They were both girls, Winifred Una, who was born in Timaru on 31 July 1894 and died 18 May 1895, and Ivy Dorothy born on 28 March 1899 and died just 4 days later on 1 April.
In Timaru, the family first resided in Sarah Street and later moved to a house situated on the corner of Elizabeth and Matilda Streets, known as Buckholm House. They were Presbyterian and, forming part of the Reverand William Gillies’ congregation, would have attended Trinity Church, originally located on Barnard Street. It would appear that John’s mother Margaret later attended Chalmers Church, constructed between 1903 and 1904, on the corner of Elizabeth and Sophia Streets. She formed part of the Chalmers Church sewing guild and was noted as one of their ‘best and most faithful workers’. John’s father, Thomas, was a prominent and well-respected man in Timaru. He was one of the owners of the South Canterbury Woollen Mills, located on Bank and Arthur Streets. He was also a member of numerous societies, including the Caledonian Society, of which he was a vice president, the Pioneer Building Society, the Masonic Lodge, the Lodge of St John, and the South Canterbury Burns Club. Thomas Virtue Dalgleish died tragically on 25 June 1900 when he fell between two carriages of a train that had just departed Palmerston. Margaret Jamieson Dalgleish died on 17 May 1916, and Buckholm House was put up for sale around one month later.
John attended Waimataitai Primary School, and in 1902, when he was in Standard Four (now Year Six), he won a prize for attendance. He completed his secondary education at Timaru High School (also referred to as Timaru Boys’ School). John excelled at sports. He won the junior athletic swimming and running championships at Timaru High School, played football with the Timaru Club and later Zingari, and was a member of the Timaru Rowing Club. In 1908 and 1909, he was enrolled at Timaru Technical School (which went on to become Aoraki Polytechnic and Mountainview High School) for typing.
Upon finishing his studies, John worked at DC Turnbull & Co, a merchant and export company situated on Strathallan Street. He later relocated to Oamaru, where he lived on Wharfe Street. He took up the position of shipping clerk at the North Otago Farmers Co-operative Association, which was his occupation when he enlisted with the New Zealand Expeditionary Force. In Oamaru, John played football for the Old Boys Club and the North Otago team, for whom he was ‘one of the most reliable members’. He played tennis and was considered a popular member of the Oamaru Tennis Club as well as the Oamaru Swimming Club, whose competitions he frequently won. Several newspaper publications comment on his popularity, the North Otago Times writing that he ‘was very enthusiastic in everything he adopted, and was well liked by all who were associated with him either in business or sport.’
John was 22 years old and single when he enlisted in Oamaru on 15 August 1914. According to his attestation, he had not previously served in any military or naval force but had been registered for compulsory military training in Timaru. Upon enlisting, he was five feet six inches tall, weighed 140 pounds, and had a fair complexion with brown eyes and brown hair. He joined the Otago Infantry’s 10th regiment and was given the rank of corporal.
In his Official History of the Otago Regiment: NZEF in the Great War 1914-1918, Lieutenant Arthur Emmett Byrne explains that Tahuna Park in Dunedin became the ‘concentration point’ for the Otago Province, which comprised the 4th (Otago) Regiment, the 8th (Southland) Regiment, the 10th (North Otago) Regiment, and the 14th (South Otago) Regiment. Byrne further explains that men began arriving at Tahuna Park on 7 August 1914 and that three-fifths of them, all volunteers at this stage, had no previous military training. The departure date for the first contingent was planned for 28 August which allowed very little time for training the men, procuring equipment and organisation (Byrne 1921: 4-5). Having enlisted on 15 August, John Dalgleish would have been among these first men to arrive in Dunedin. At 22 he would have been a couple of years older than some of the men - many of those who enlisted were under the age of 20 - and this, combined with the military training he undertook in Timaru, is possibly why he was ranked as a corporal rather than starting as a private.
Fortunately, as Byrne recounts, the embarkation date was postponed to 25 September, thus giving the men more time to prepare. On 22 September, the troops of the Otago Regiment, who were to form part of the Main Body, traveled to Port Chalmers where they boarded two troop ships, the Ruapehu (HMNZT 5) and the Hawkes Bay (HMNZT 9), and set sail for Wellington. They arrived the evening of 24 September, along with the Canterbury transport ship, believing they would be leaving New Zealand the next morning. However, this was not the case, as the New Zealand government temporarily postponed the NZEF’s sailing for ‘imperial reasons’. The opportunity to spend more time training was not wasted. Byrne notes that the men were taken ashore during the day and given their first training ‘in tactical operations over the hills around Wellington’ and one battalion a day was taken to the Trentham Camp in Upper Hutt for musketry practice (Byrne 1921: 5-6).
The date for sailing was, in the end, set for 16 October 1914. That morning, the two above-mentioned Otago troop transport ships, eight others carrying the Canterbury, Wellington, and Auckland regiments and, as Byrne points out, the four fleet escort cruisers Minotaur, Psyche, Philomel and Ibuki, left Wellington Harbour, cheered on and farewelled by a multitude of Wellingtonians as well as His Excellency the Governor, the Military Headquarters Staff and Ministers of the Cabinet (Byrne 1091: 5-7). This first New Zealand Expeditionary Force contingent comprised 3818 horses and 8574 soldiers, who left Wellington under the impression they were headed for Europe (Pugsley 2004: 63). In Western Australia, the NZEF joined with the Australian Imperial Forces (AIF) convoy, becoming the Australian and New Zealand Army Corps (ANZAC) (Pugsley 2004: 64).
According to the Ruapehu’s and the Hawkes Bay’s voyage timeline, documented by the Friends of Kangaroo Ground War Memorial Park Inc, the convoy arrived in Hobart, Tasmania on 21 October and Albany, Western Australia on 28 October. They departed from King George Sound in Albany on 1 November and arrived in Colombo, Sri Lanka (then known as Ceylon) on 15 November. The next stop was Aden, a port city in Yemen, on 25 November. From there, they passed through the Suez Canal on 1 December and arrived in Alexandria on 3 December. For soldiers such as Dalgleish, conditions on the ship were grim. Christopher Tobin recounts in Gone to Gallipoli: Anzacs of Small Town New Zealand go to War, that ‘only five wash basins and four toilets were available for 500 men’ and the food was often ‘not fit for dogs’ (Tobin 2001: 14). The soldiers endured these conditions for a total of 48 days.
As Tobin states, the change in destination from Europe to Egypt was due to Turkey’s entry into the war as an ally of Germany. The New Zealand soldiers were sent to Zeitoun, a camp that was set up in the desert ten kilometres north-east of Cairo, to undergo intense training. The day began with a bugle sounding at 5.30am and, as Tobin describes, thus continued: ‘at 6.30am they had physical drill; at 7am breakfast comprising porridge, bully beef and coffee. From 8am to 2pm, the solid work was undertaken, often involving a march into the desert to practise attacking and entrenching. After lunch the day ended with rifle drill from 3.30pm to 4pm. The peak of the training entailed a 38km march in full pack, bivouacking, eating an evening meal, and then digging trenches before sleeping.’ To add to the difficulty, training took place ‘in choking dust and sand under a hot sun.’ However, it was not all work and no play. Located a mere eight minutes by train from Cairo, the soldiers would leave the Zeitoun camp to visit the city, as well as the pyramids, the ancient city of Memphis, and the ruins of Thebes (Tobin 2001: 17-18). John Dalgleish likely went on some of these exciting excursions.
The first chance of an encounter with the enemy came for Dalgleish before the New Zealanders were sent to Gallipoli. Tobin explains that for the 30 years prior, Egypt had been under British control. In December 1914, it was declared a protectorate of the British Empire and a pro-British sultan was installed. However, the Turks considered Egypt part of their Ottoman Empire and in January 1915, sent 25,000 troops across the Sinai desert, intending to drive out the British and reclaim Egypt (Tobin 2001: 19). By this time, Dalgleish had been promoted to Lance Sergeant, an event that had taken place on 22 December 1914. Byrne recounts that on 25 January 1915, as a response to reports that the Turks were advancing on the Suez Canal in three columns, the decision was made to send more soldiers to that area to support the Indian troops already there holding the line. The next morning, the New Zealand Infantry Brigade was deployed. The Otago and Wellington Battalions were sent to four posts along the eastern bank of the Canal between Suez and Little Bitter Lake. Brigade Headquarters, Auckland and Canterbury Battalions were sent to Ismailia (further north along the Canal). The Turks began their attack on 3 February, but it completely failed - by the next day, the fighting had ended and they were in retreat. The New Zealanders sustained one death and one soldier was wounded, but many Turks were killed and 650 were taken prisoner. The Otago Battalion had been in reserve and therefore did not directly take part in the attack (Byrne 1921: 11-12).
Expelling the Turks from Egypt was not enough for Britain and its allies, and, as Tobin recounts, they decided to attack the Turkish peninsula by naval assault via the Straits of the Dardanelles. After six weeks of hostilities, this plan was abandoned and, despite ‘grave misgivings’, it was decided an Allied army should make a land attack, with the hope of capturing Constantinople (now Istanbul) and gaining control of the Black Sea. The initial date for the attack was 14 April 1915, but it was pushed back to 25 April, which unfortunately gave the Turks time to regroup and prepare well to defend the peninsula. The Allies, on the other hand, were under-resourced and their maps were based on surveys taken 50 years prior (Tobin 2001: 21).
According to Byrne, the 2nd New Zealand Reinforcements had arrived at the Zeitoun Camp on 28 January and the 3rd Reinforcements had arrived on 29 March. In early April, the Otago Regiment was preparing to leave Egypt and head to Mudros, on the island of Lemnos, as part of the Mediterranean Expeditionary Force. Deployment from Zeitoun to Alexandria, where General Headquarters had been established, began on 9 April. At Alexandria, the Otagos were allotted the transport ship the Annaberg, which had been captured from the enemy and, like most of the vessels waiting in the harbour, was ‘filthy beyond description and abominably louse-ridden.’ From 10 April, the transports began to leave Alexandria for Mudros, a journey which took three days. Over the next ten days, the time would be spent regrouping the troops, practising disembarkation, and undertaking route marches on the island’s shore, before returning to the ships (Byrne 1921: 12-14, 18).
Many historians have studied the details of what would transpire over the next two weeks and it is common knowledge that, for many reasons that will not be explored here, things did not go well for the Allies. Byrne recounts that at 2pm on 24 April, the contingent of ships began sailing out of Mudros harbour towards the shores of Gallipoli (Byrne 1921: 19). For John Dalgelish’s personal experience of the events of 25 April and the days following, we are fortunate to have his first-hand account, conveyed in a letter he wrote to his mother from a hospital bed in Cairo after he was wounded. It was originally published in the Timaru Post and then in the Christchurch Star on 22 June 1915:
"About six o’clock on the morning of the 25th we left for Gallipoli, a six-hours easy run, where a marvellous sight awaited us. We passed close to where the British Tommies were landing, and the ships were bombarding the Turks. About an hour later we arrived at the spot where we were to land. Here the Navy was going for all it was worth to cover our landing.
"The Australians commenced landing at four o’clock in the morning, and it must have been simply hell. The spot where we landed was, by the way, under very high and steep cliffs about 600 feet high and covered with dense scrub. Of course the Turks had well concealed trenches and the fire from them and the machine guns - to say nothing of the shrapnel - was deadly, and very few chaps out of the first three boats landed. But the Australians showed great dash and bravery, and they were no sooner out of the boats than they charged the hill and drove the Turks before them. They kept them going till the third ridge, where the Turks were heavily reinforced, and as we could not get our reinforcements up in time the Australians were forced back to the second ridge.
"It was the 2nd (South Canterbury) Regiment that went up to reinforce them, and, I believe, that they suffered very heavily. It was about three or four o’clock in the afternoon when we landed. First of all we got into torpedo boats, which took us into within a mile of the shore, and then were transferred to row boats. Shrapnel was falling all around us, and it gave one a funny feeling and no mistake. Just as we were getting out of the boats one exploded in the air a little way in front of us, but none of us were hit. That night we were in reserve, and naturally we commenced to dig ourselves in on the top of the first ridge.
"On Tuesday morning about twenty of us were out after snipers on the ridge at the rear of us, but did not get any. The nature of the ground and the thick scrub gave excellent cover for this branch of the Turkish army, and they accounted for plenty of our chaps. One sniper who was caught had two boxes of ammunition and a week’s rations. It was stated that another one caught had his face painted green, also his rifle, and pieces of scrub tied to him. I don’t know if the above is true or not, but it is quite possible. Another story states that two Germans dressed as Australians, with the ambulance badge on their arms were carrying a stretcher near the beach and when passing our outposts were asked who they had on the stretcher. They answered, “A wounded Australian we are taking down to the beach.” They thought his speech was peculiar, and on lifting up the cover on the stretcher, instead of a wounded man a machine gun was found.
"About eleven o’clock they sorted us out, and got busy with shrapnel, and the next three hours were the worst I have experienced in my life. My dug-out wasn’t very good as I was seeing that the chaps in the section were well fixed up before I got busy with my own, with the result I was not finished when the fun began. As soon as it started it was a case of “Duck, you’re spotted!” The shrapnel was a continual rain for three hours and one dare not shift. I did nothing else but smoke cigarette after cigarette. A kerosene tin alongside my dugout was riddled, and another shell struck the earth above me and covered me with earth; but a miss is as good as a mile. About 2.30 we were told to reinforce the firing line, and about three o’clock I took about a dozen chaps into the trench.
"We had good fun getting on to the Turks at about 400 to 500 yards. We had things all our own way till about five o’clock, when they got busy on us with rifle, machine gun and shrapnel. Two of my chaps were killed, and five left the trench wounded before I did, and I met two more on the boat next morning, so it seems that we struck a fairly hot corner. The noise there is awful; what with the big guns of the navy, and batteries on shore, and machine guns, which resemble a motorbike, going some. It was great when “Lizzie” fired her 15-inch. You could easily tell her by the noise, and everybody would watch to see the result of her shot. On two occasions I saw her get two Turks’ trenches and saw the remains of Turks in all directions. One of her shrapnel shells contains 1700 bullets, so it should make a mess of things, I should imagine."
According to John’s casualty form in his military personnel file, he sustained a gunshot wound to his right shoulder on 28 April. He was sent to a hospital in Cairo, arriving there on 1 May. His name was included in the Oamaru Mail list of wounded on 6 May, and on 22 May his mother’s name was on the list of parents who had received telegrams from the Defence Office stating ‘your son is progressing favourably’, published by the Timaru Herald. On 26 May, John left Alexandria to return to the Dardanelles, rejoining his unit on 4 June. On 5 June, he was promoted to Sergeant at Monash Gully on the Gallipoli Peninsula.
Whilst Dalgleish was arriving in Cairo, his battalion was being decimated. Tobin recounts that on 2 May, later remembered as ‘Bloody Sunday’, in a poorly executed attack, the Otagos ‘were slaughtered’. A Sergeant who, like Dalgleish, was from South Canterbury but was fighting with the 10th North Otago Company, wrote home to his parents in Orari that ‘on Otago’s black day we made a night attack with 850 men and in the morning 250 were left but about 100 turned up late.’ Tobin states that after that, the Otago soldiers were referred to as ‘the unlucky Otagos’ and the place where most of them died in the attack was named ‘Deadman’s Ridge’ (Tobin 2001: 57).
According to Byrne, the 4th reinforcements of Kiwi troops arrived on 9 June and, given the reduced size of the regiment and ongoing daily casualties, they were much needed. By this time, the focus of attention had become Quinn’s Post, located on the outer circumference of the semi-circle that was the Anzacs' line. There was ‘bitter and prolonged fighting’ at this post, and holding it was critical. The nearby Courtney’s Post was also crucial, and the New Zealand battalions were put on a rotation to occupy these two posts. For those holding the forward line, periodic harassment from the enemy meant numerous casualties and breaches of their defence. However, the New Zealanders were lucky enough to avoid a heavy attack from the Turks at the end of June, which focused on a different section of the Anzac line (Byrne 1921: 40-43).
June and July brought myriad other issues. Tobin recounts that the summer heat depleted the troops’ energy levels. Furthermore, the flies were increasing to ‘horrendous levels’ and that, coupled with a poor diet, meant dysentery was rife. There were no proper toilets, only latrines or holes in the ground, no toilet paper, and no water for handwashing. Almost all the men experienced some level of dysentery, some only mild, but many succumbed to this terrible illness (Tobin 2001: 83; Byrne 1921: 45). Food and drinking water were scarce, and the men got little sleep (Abrahart 2018: 79, 81). On top of all this, there was backbreaking work to be done. When they were not in the trenches themselves, the men were held in reserve and working hard digging trenches, building and improving the posts and dugouts, making bombs out of jam or tobacco tins, and making periscope rifles (Abrahart 2018: 71-72, 74, 77).
The next major offensive undertaken by the Anzacs would be Sergeant John Dalgleish’s last. Tobin indicates that in late May a plan had been made to attack and take the Chunuk Bair heights, thus extending the area held by the Anzacs beyond their cramped beachhead. By 5 August, there were 40,000 troops at Anzac Cove, and they began to attack the Turkish positions that evening. The plan of attack was ‘complicated, fraught with risk and an even bigger operation than the April landings’ - the terrain was tough and the size of the Anzac forces was nowhere near full strength. However, the attack went ahead (Tobin 2001: 78, 86-7, 90).
As Byrne explains, the attack was planned to start on the night of 6 August, with the critical part of the assault taking place on the summit of the main Sari Bair ridge just before daylight. The Otago Battalion’s mission was to attack an area known as Rhododendron Spur and, together with the Wellington Battalion, continue to Chunuk Bair. Despite considerable opposition from the Turks and severe casualties, by daylight the Otagos were successful in reaching their objective. There were some delays and confusion, and the element of surprise was quickly diminishing, however, the soldiers pressed on with their attack until late afternoon on 7 August, when they stopped to hold their positions until nightfall. The next attack was planned for 4.15am on 8 August, with the Otago Battalion in reserve on Rhododendron Spur. Opposition was fierce and little progress was made. At dusk, the Otagos and the Wellington Mounted Rifles were ordered to relieve the Wellington Battalion on the frontline on Chunuk Bair. If things had been difficult during the day, they were more difficult now. There was no water or food, no chance for the wounded to be removed, and the exhausted soldiers were forced to dig the hard ground to deepen the shallow trenches whilst under constant threat from the Turks. At daylight, the enemy reached the first line of trenches but was then driven out. Casualties suffered throughout the night were heavy. None of the efforts throughout the day on the 9th were successful, and after three days and nights of fighting, the New Zealanders who remained clinging to the Chunuk slopes were exhausted. The order to be relieved was given at 8pm but it wasn’t until 2am on the 10th that all of the Kiwis were relieved. When the four-day battle finally came to its unsuccessful end, the casualties numbered 12,000 (Byrne 1021: 49, 51, 53-63).
Among those who had perished was John Alexander Dalgleish, killed during the fighting at some point on 9 August. There seems to have been some confusion initially as to whether this was the case. He was thought to be wounded, but was not included in the records, and then assumed dead, but no one had reported burying him (it was thought he might have been buried by the Turks). Later, he was reported to be with his regiment before eventually being confirmed as killed in action. It appears that John’s name was not included on the Roll of Honour, published by the Timaru Herald, until 29 March 1916, only after his death was confirmed by a court inquiry. There were also longer articles written about him a couple of days later in the Oamaru Mail and the North Otago Times. These articles recount some of his early life and involvement in the Gallipoli campaign, stating that as a well-liked and reliable man, many regretted that he would never return home.
For his service, John Alexander Dalgleish was awarded three medals: the 1914-15 Star, the British War Medal (07/10/1921), and the Victory Medal (18/08/1922). The actioning of his medals was completed on 28 September 1923. John’s Memorial Scroll was sent to his brother Richard in June 1921, and his Memorial Plaque was sent in January the following year. In Turkey, John is commemorated on the Chunuk Bair New Zealand Memorial to the Missing (panel 14), in Gallipoli. In Timaru, he is commemorated on the Memorial Wall at the Timaru Cenotaph on Queen Street, unveiled on 25 April 1926. John is included on the commemorative plaque in the Timaru Boys High School Memorial Library and the Mountainview High School Roll of Honour. He is also commemorated on the Waimataitai School War Memorial and the Chalmers Church Memorial Plaque. Entries for him can be found online on the NZ War Graves Project, the Auckland Museum Online Cenotaph, the Commonwealth War Graves Commission, the Royal British Legion’s site ‘Every One Remembered’, and A Street Near You.
‘They shall grow not old, as we that are left grow old:
Age shall not weary them, nor the years condemn.
At the going down of the sun and in the morning
We will remember them.’
(For the Fallen, Laurence Binyon)
Sources
Personal and Family History: https://www.bdmhistoricalrecords.dia.govt.nz/ ; https://www.geni.com/people/Thomas-Dalgleish/6000000139808049822; https://www.geni.com/people/Margaret-Dalgleish/6000000139808226825; https://paperspast.natlib.govt.nz/newspapers/CHP18930106.2.26.7; https://www.geni.com/people/Richard-Dalgleish/6000000139981532132; https://www.geni.com/people/Virtue-Dalgleish/6000000139807436834; https://www.geni.com/people/James-Dalgleish/6000000139988604091; https://www.geni.com/people/William-Dalgleish/6000000139989868050; https://www.geni.com/people/Winifred-Dalgleish/6000000148984633866; https://paperspast.natlib.govt.nz/newspapers/THD18950520.2.8; https://www.geni.com/people/Ivy-Dalgleish/6000000148985332845; https://paperspast.natlib.govt.nz/newspapers/THD18990403.2.9; https://paperspast.natlib.govt.nz/newspapers/THD19160608.2.50.2; https://paperspast.natlib.govt.nz/newspapers/TS19140928.2.61; https://pcanzarchives.recollect.co.nz/nodes/view/116689; https://www.timarupres.org.nz/about-us/; https://www.mountainview.school.nz/About/History/; https://paperspast.natlib.govt.nz/newspapers/THD19160824.2.42; https://paperspast.natlib.govt.nz/newspapers/SCANT19000628.2.22; https://paperspast.natlib.govt.nz/newspapers/THD19000627.2.25; https://paperspast.natlib.govt.nz/newspapers/SCANT19000626.2.25; https://paperspast.natlib.govt.nz/newspapers/OW19000705.2.25; https://paperspast.natlib.govt.nz/newspapers/LT19000627.2.39; https://paperspast.natlib.govt.nz/newspapers/THD19000628.2.29; https://paperspast.natlib.govt.nz/newspapers/SCANT19000707.2.17; https://paperspast.natlib.govt.nz/newspapers/THD19000628.2.2.7; https://paperspast.natlib.govt.nz/newspapers/SCANT19000629.2.8; https://paperspast.natlib.govt.nz/newspapers/SCANT19000628.2.34.3; https://paperspast.natlib.govt.nz/newspapers/SCANT19001001.2.8; https://paperspast.natlib.govt.nz/newspapers/THD19160520.2.2.6; https://paperspast.natlib.govt.nz/newspapers/THD19160608.2.26; https://paperspast.natlib.govt.nz/newspapers/THD19160527.2.64.7; https://paperspast.natlib.govt.nz/newspapers/THD19021219.2.6; https://www.timaru.govt.nz/__data/assets/pdf_file/0009/673866/Historic-Heritage-Assessment-Report-HHI43-former-Miles-Archer-and-Co.-stores,-tramway-tunnel-and-siding-DC-Turnbull-and-Co.-stores,-tramway-tunnel-and-siding-and-offices-Category-A.pdf Military involvement: https://ndhadeliver.natlib.govt.nz/delivery/DeliveryManagerServlet?dps_pid=IE10544000; https://ndhadeliver.natlib.govt.nz/delivery/DeliveryManagerServlet?dps_pid=IE11149178; https://ndhadeliver.natlib.govt.nz/delivery/DeliveryManagerServlet?dps_pid=IE10585378; https://ndhadeliver.natlib.govt.nz/delivery/DeliveryManagerServlet?dps_pid=IE19180095; https://paperspast.natlib.govt.nz/newspapers/OAM19150506.2.24; https://paperspast.natlib.govt.nz/newspapers/THD19150522.2.46; https://paperspast.natlib.govt.nz/newspapers/TS19150622.2.75; https://paperspast.natlib.govt.nz/newspapers/OAM19160331.2.43; https://paperspast.natlib.govt.nz/newspapers/NOT19160401.2.33; https://paperspast.natlib.govt.nz/newspapers/THD19160329.2.38; https://paperspast.natlib.govt.nz/newspapers/THD19160928.2.50; Books: Official History of the Otago Regiment: NZEF in the Great War 1914-1918, A.E. Byrne, 1921 (accessed digitally at https://digitalnz.org/records/32123783); The ANZAC Experience: New Zealand, Australia and Empire in the First World War, Christopher Pugsley, 2004; Gone to Gallipoli: Anzacs of small town New Zealand go to war, Christopher Tobin, 2001 Information on Vessels and Voyages: https://discoverytrailscomau.wordpress.com/18-1-6-hmsnz-ships-during-ww1/; https://navymuseum.co.nz/explore/by-themes/world-war-one/troopships-departed-nz-ww1/ Commemoration: https://www.cwgc.org/visit-us/find-cemeteries-memorials/cemetery-details/76000/chunuk-bair-new-zealand-memorial/; https://www.timaru.govt.nz/__data/assets/pdf_file/0008/673856/Historic-Heritage-Assessment-Report-HHI33-South-Canterbury-War-Memorial-Category-A.pdf; https://www.timaru.govt.nz/__data/assets/pdf_file/0007/673855/Historic-Heritage-Assessment-Report-HHI32-Timaru-Boys-HIgh-School-Memorial-Library-Category-A.pdf; https://museum.timaru.govt.nz/__data/assets/pdf_file/0013/60061/Mountainview-High-School-Roll-of-Honour.pdf; https://www.nzwargraves.org.nz/casualties/john-alexander-dalgleish; https://www.aucklandmuseum.com/war-memorial/online-cenotaph/record/C3620; https://www.cwgc.org/find-records/find-war-dead/casualty-details/679871/john-alexander-dalgleish/; https://www.everyoneremembered.org/profiles/soldier/679871/; https://astreetnearyou.org/person/679871/-
External Links
Related Documents
Researched and Written by
Sarah Mahalli
Currently Assigned to
Not assigned.
 Licensed under a Creative Commons Attribution-NonCommercial 4.0 International License unless otherwise stated.
Tell us more
Do you have information that could be added to this story? Or related images that you are happy to share? Submit them here!